Blog
5 photography tips for beginners
1. Composition. Learn to frame things well. Try moving the camera just a small amount and see how that affects your image. Learn the rule of thirds and use it, then when.it is second nature, try breaking it. 2. Controlling Light Experiment with the light. Grab a light (even a desk lamp will do) and an object like a plant. Then try moving the desk lamp around the plant and see how the light changes. Try framing shots with the light in different places. You’ll get a feel for how light works with this hands on game. 3. f/8 and be there. This is a famous saying in news or war photography. Basically it means that if you set your aperture to f/8 (around the middle for most lenses) then your shots will usually come out as long as you are in the right place at the right time. Carry your camera with you as often as you can. The best camera is the one you have with you. 4. Timing Ask a friend to model for you for a short time and get them to jump in the air (or off a low wall) while you try and capture them in the air. Don’t count down, try and learn when is the best time to press the shutter. You can also practice this at a place like a race track or bike park, anywhere there are fast moving objects. 5. Spotting light. Start noticing the natural light around you. Be aware of the sun shining through the trees, notice when the light in a room is particularly beautiful or striking, pay attention to interesting or notable lighting. You’ll realise that often the most beautiful light happens in the early morning or late afternoon. Whenever you spot some light, photograph...
read moreWhat is white balance?
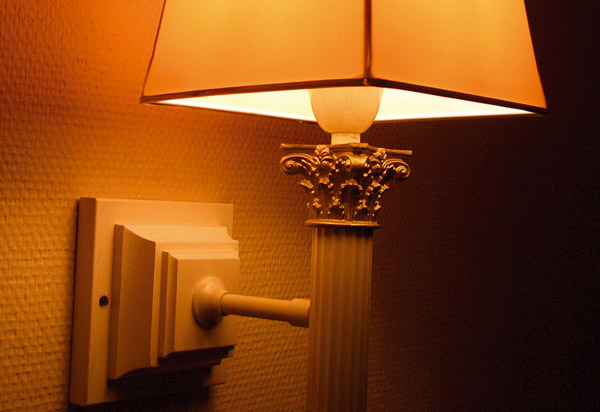
You may have noticed that light comes in lots of different colours. Most noticeably, a sunset is deep orange, street lamps are yellowy orange, daylight is blueish, the lamps in your home are yellow (think of when you are outside at night, and you see a home lit up in the distance). Colours like red and orange are referred to as warm, while blue is cool. Our eyes are very good at adjusting for these differences. But cameras will over accentuate them. This can lead to problems. Most commonly, if you shoot images inside your home with the lights on, and no flash, they are likely to come out very orange. You can compensate for this by setting your white balance correctly. Here are the usual different white balance setting and when you should use them Auto – This lets the camera guess at what it should use. Tungsten – Use this under tungsten lights (such as in your home). It will cool down the colours from warm oranges towards more natural blues. Fluorescent – Use this under fluorescent lights (like in many offices) Daylight/Sunny – Obviously, use this during sunny weather Cloudy – Use this outside when it’s cloudy and it will warm up the colours as little. Flash – Camera flash is a very cool shade so this mode will warm the...
read moreWhat is depth of field?
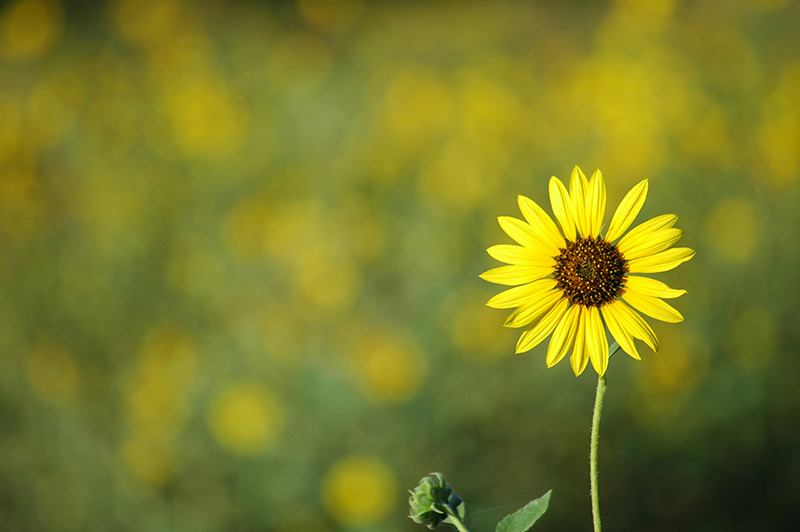
The depth of field is how much of the photograph is in focus. For example, a photograph has “shallow depth of field” if the foreground is in focus and the background is out of focus. In the fololwing photograph, there is a long depth of field, the sunflowers in the foreground are in focus and so are the ones in the distance. In the following photograph, there is a shallow depth of field, there is one sunflower in focus and then everything in the background is very blurred. How to control the depth of field The depth of field of a photograph is controlled by the aperture. When you use a wide aperture such as f/2.8 – you will create a shallow depth of field. When you use a small aperture such as f/22 – you will create a long depth of field. Also when you are using a more zoomed in lens, you will end up with a shallower depth of field. Have fun...
read moreShutterspeed
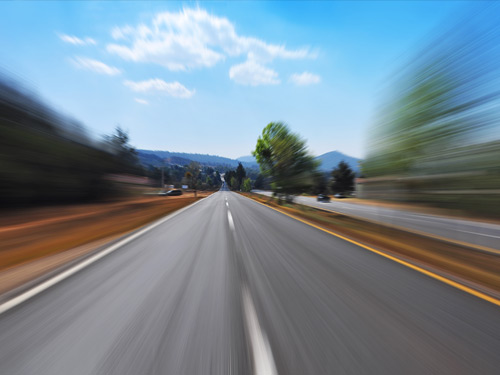
Right in front of the sensor of your camera, there is a shutter. This opens to allow light onto the sensor for your photograph. The shutter speed can be varied. In some cameras you can set the exact shutter speed yourself and in other cameras, it is done automatically. When there is a short shutter speed, like 1/600th of a second, most motion will be frozen. But also, not much light will get into the camera and, if all the other settings are kept the same, the photo might be quite dark unless you use a flash or there is a lot of ambient light such as a really sunny day. When there is a slow shutter speed, like 1/30th of a second, or even a second, or 15 seconds, much more light will get into the camera and the photo will be brighter – but also the motion in the scene might be blurred. Sometimes motion blur can look good in a photograph But sometimes you will want to use a tripod with a long exposure, so that things are still even though the shutter speed is slow. A rule of thumb is that, if you are “hand holding” your camera (i.e. there is not a tripod involved) then the slowest shutter speed you can use and not have blur from moving the camera is 1/50 to 1/60th of a second. However, if you are using a lens that is very zoomed in, this decreases. A good rule of thumb is to look at how zoomed in you are, if you are at 200mm, then the slowest shutter speed you can hand hold is going to be about 1/200th of a second, maybe a little slower if you have really steady hands! You can experiment with different shutterspeeds to create different exposures and different blur...
read moreWhat is aperture?
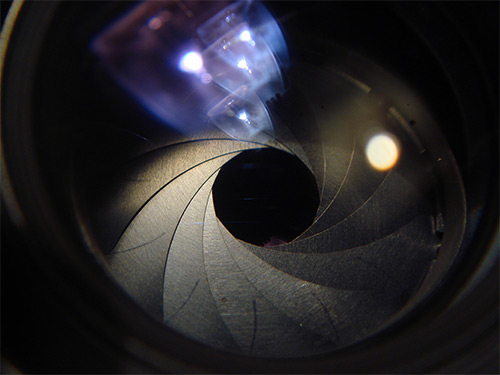
Aperture is the hole through which light travels into the camera. It sits behind the lens and in front of the sensor. As you can see in this picture, the hole is created by lots of shutters. This enables the size of the hole to change. When the hole is larger, more light passes onto the sensor, and vice versa. Somewhat confusingly, a large aperture has a number like f/2.8 and a small aperture has a number like f/22. What does aperture affect? In low light situations, we need to use a wide aperture, like f/2.8. This will enable lots of light to get into the sensor. However, it also reduces the depth of field, meaning less of the photograph will be in focus. When we use a narrow aperture, like f/22, lots of the photograph can be in focus, from the foreground to the background, but less light will get into the sensor and the photograph will come out darker. In cameras Lenses on DSLRs have different maximum apertures. Some cameras only go up to f/3.5 and some go as far as f/1.2. That might not sound like a big difference but actually, it can make a huge difference if you are doing photography in low light. However, lenses with larger apertures (known as fast lenses) are more expensive. There are some great options though. The Canon “nifty fifty” is one example. It’s a 50mm lens, with a speed of f/1.8 and if you have a Canon DSLR it’s a great option....
read moreWhat is the difference between digital and optical zoom?

Optical zoom is a “true” zoom, like you would get on a film camera. It means that the lens extends and the optics within the camera zoom in on the scene. Digital zoom is a “crop” zoom. The camera enlarges the center of the frame and clips away the edges. You could get the same result by cropping the image on your computer and enlarging it. So what are the pros and cons of each? Optical Zoom Pros Image quality is maintained even when zoomed in Zooming in changes the perspective of the image Cons More expensive Adds weight to the camera Digital Zoom Pros Cheap Adds no weight or bulk to camera Cons Reduces image quality by literally cropping away some of your megapixel rating Could just as easily be done on a computer later if needed Artificial Conclusion So the bottom line is that optical zoom is the one to look for! If you are looking for a camera with a great optical zoom, check out the Samsung WB250F which comes with a massive 18x optical...
read moreThe Rule of Thirds
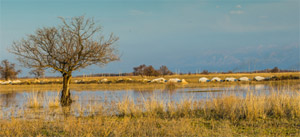
The Rule of Thirds is the most fundamental of all the composition rules. It is based in science and is the first step to understanding good composition. Of course, all rules can be broken but you must learn and use them before you can successfully break them! The rule is a guideline based on the “Golden ratio” which appears all over the place in nature. The ration is 1:1.3. This means that, aesthetically, images divided into thirds visually are more dynamic and pleasing than images divided into halves. So, you should position key elements of your image along lines 1/3 of the way from the edge of the frame, rather than in the centre. Here is a simple example! You can see how the frame has been divided into 9 equal sections. Visually strong elements, like the horizon and the tree have been placed along the dividing lines. This is a successful rule of thirds composition. Try it...
read moreWhat camera should I buy as a beginner?
As a photographer, my friends often ask me for advice about buying a camera when they want to try out photography as a hobby. My advice is always to keep it simple to begin with. It is tempting to save up until you have enough cash to splash on some really high end gear, but that isn’t necessary. When you are starting out, the two most important things to learn are composition, and how to use the light. You can do both these things with a simple point and shoot camera. Using a simple camera will allow you to concentrate on learning these important basics. When you have them down, you will naturally find that you are ready to buy a more complicated camera, when you recognise the limitations of your simple one. Composition is a real joy to learn. There are many techniques you can learn, such as the rule of thirds, which will soon become second nature, and we will discuss these in the future! Learning to use and understand light is also really enjoyable. You will develop an eye for what light will make a good photograph and how to make the most of the light available. You can also start experimenting with adding in artificial light, such as flash, or even a simple desk lamp! A simple camera is the ideal way to begin your photography...
read more